Thursday, June 16, 2011

Bundle Monster Nail Art Designs 4

Hello all!!

So I did another nail art design. This time I made it very summery.
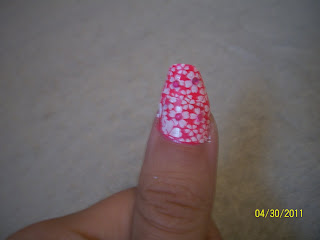
I used hot pink nail polish and a flowery Bundle Monster nail pattern.

So, i have wide nails because I used to bite my nails so now they grow wide and stubby and the Bundle Monster full nail designs don't fit on my nail. So, I use them as french nail designs. I stamp them  sideways to make a french design.

This time, I used a baby pink nail polish to make a french manicure, then stamped the small daisy flower pattern on top using my NYC (111A- Fuschia Shock Creme) nail polish and it worked with the stamping tool. I was shocked!! It looked good too, it didnt smudge or anything.

The color is actually brighter than what it looks like in the pic so it looks very summery.

I love it!! It looks like I spent hours doing my nails, although it didnt take long.


Pink Bundle Monster flower full nail pattern with baby pink french manicure base design.

LOL..they look like stars in the pic. I should've zoomed in more! These are my pink bundle monster flower nail art designs.

More Bundle Monster nail art designs coming soon!

Wednesday, June 15, 2011

Bundle Monster Nail Art Designs 3

Hello... Here are  few more of my designs.
I am trying to add more spring and summer designs.


I think this manicure is soooo cutee. I got sooo many compliments on it. First, I did a simple white french manicure then stamped some ladybugs from the bundle monster plates using red Konad polish. I did them in different directions so they don't look so uniform, which makes them fun. Then using my dotting tool and black nail polish, I dotted a different pattern for each nail as if each lady bug is walking in a different direction.

Red lady bugs on white french manicure nail art design. 

Fun and cute nail design with Bundle Monster lady bugs on a white french manicure. This design is amazing for spring or summer.
To spunk the design up abit, you can add black rhinestones on the back of the lady bugs or use a small dotting tool and add a few black dots.
This manicure can also work on short nails or pedicures.

More designs to come!!

Thursday, June 2, 2011

Bundle Monster Nail Art Designs 2

Hello all!! So here are a few more of my Bundle Monster Nail Designs.
If you would like to see more, check out my other posts.

Bundle Monster white flower design on a pink background with pink and green rhinestones.

Bundle Monster flower nail art design in white

Summer nails!!! This Bundle Monster flower design is sooo pretty!! I added yellow rhinestones in the middle of the flower to accentuate the design abit more cuz I was going to a wedding although it would look good without them.  This flower design would look good with any background colour.

This French manicure is great if you are going to a wedding or party. It would look better on others, cuz my nails grow crooked because I used to bite them.

Hot pink nails with Bundle Monster dot design in white. Thsi design is great for summer or spring because of the bright pink colour. Its fun!

Bundle Monster silver and purple nails with rhinestones.

Close up view of my Bundle Monster silver and purple nails with rhinestones. Its so shiny!!

Thank you all for checking out my blog. Leave me your feedback.
Ciao Chicas!! <3 <3

Wednesday, May 18, 2011

Growing long, strong nails

Hello All!!

So a few of my friends are trying to grow their nails, but it's hard...their nails keep breaking. So here's how I did it!!

1- Before applying nailpolish to nails, rub olive oil to cuticle and nail and massage for a few minutes. This allows the blood to rush to the nails and provides nurishment.

2- Always keep nails polished. The nail polish provides a second layer to the nail like having thick nails, which limits breaking.

3- Always apply a base coat to the nails. This not only helps the nail not change colour, but also adds a layer to the nail like a shield to prevent moisture from penetrating the nail and making it weak.

4- Wear gloves when washing dishes or when keeping hands in water for prolonged periods.

5- When applying lotion, massage hands and nails to stimulate follicles.

6- Wear nailpolish with strengtheners to harden nails.

I will be posting a blog soon on how to fix a broken nail without clipping it so it stays long. It's an easy method that works!!

Hope this helps :D

Tuesday, May 10, 2011

Water Marbelling

This is my first time trying water marbelling for nail art. This concept is very time consuming and you can control how thin or thick the marbelling effect is.


I used green, silver and brown nail polishes on a silver or white base. The middle finger I did on a brown base so the colours came out somewhat darker ( I didn't like it) but the other nails were done on a lightr coloured base so they came out better looking.

Freehand Nail Art

Hello0o0o0
Here are some of my free-hand designs.

This one is pink with purple french manicure and silver dots.

 This is a french manicure sticker over grey nail polish. The stickers did not last long, they were peeling after the first day.

This design I did as a beginner, learning to do designs on my nails. It turned out pretty good I think.

This is the mushroom look. LOL..It's a cute, fun and very easy design to do.

This dotted design was done when my nails were very short and brittle. Everytime they grew, they kept breaking so they are very short at that time. Its a purple background with diagonal dots. I think it would look better with longer nails so I might try it again soon.

My poor little brittle nails!! This is a simple design that I love. It's just cute!! Black french manicure with white flowers. This one too would look good on longer nails.

This firey red manicure is very bold and shiny. 

This manicure I got from Love4Nails but I did it in my own colours. I got compliments like crazy when I did it. It took long but it turned out good. I think it would look weird on short nails but works well on long ones.

Hope you liked my designs. Feel free to write comments and let me know what you think.

Bundle Monster Nail Art Designs 1

So I recently purchased my Bundle Monster Nail Art Stamping kit and as soon as I got it, I started playing around. Here are the designs I created so far.

Here's the first design I did. It's a french design with a silver background. 

 Starry Night is what I call this one. It's a navy blue background with silver stars from Bundle Monster plate.

This one is my favourite so far. Its the bundle monster cupcake with a cherry on top with a glitter background.

This picture I took before I finished cleaning up the nail but its a lilac butterfly on a pink rose from the bundle monster plates.

 This one is white flowers on a pink background with pink rhinestones. The Bundle Monster image plates for the entire nail is small and doesn't fit the nail so I stamped it horizontally and did 2 stamps.

This Bundle Monster nail art makes me feel warm looking at it. It's a sun with an orange and yellow gradient background done with a make-up sponge.

This leaf pattern was easy to do. It's Bundle Monster leaf pattern stamped twice on the nail.

This Bundle Monster heart pattern is simple but cute.

Oh I lovvvee this Bundle Monster image. The flowers have pink and green rhinestones in the middle. It's a great spring or summer manicure.


I will be adding more pictures soon.
Hope you like them!